(This webpage is still under construction.)
1. Authentication
When you launch Passerelle Author for the first time, your first step is authentication. To do this, Passerelle Author needs to know which Tenant and Environment you intend to use for saving and accessing your work. Both Tenant and Environment are determined by a license file that must be validated.
License Validation
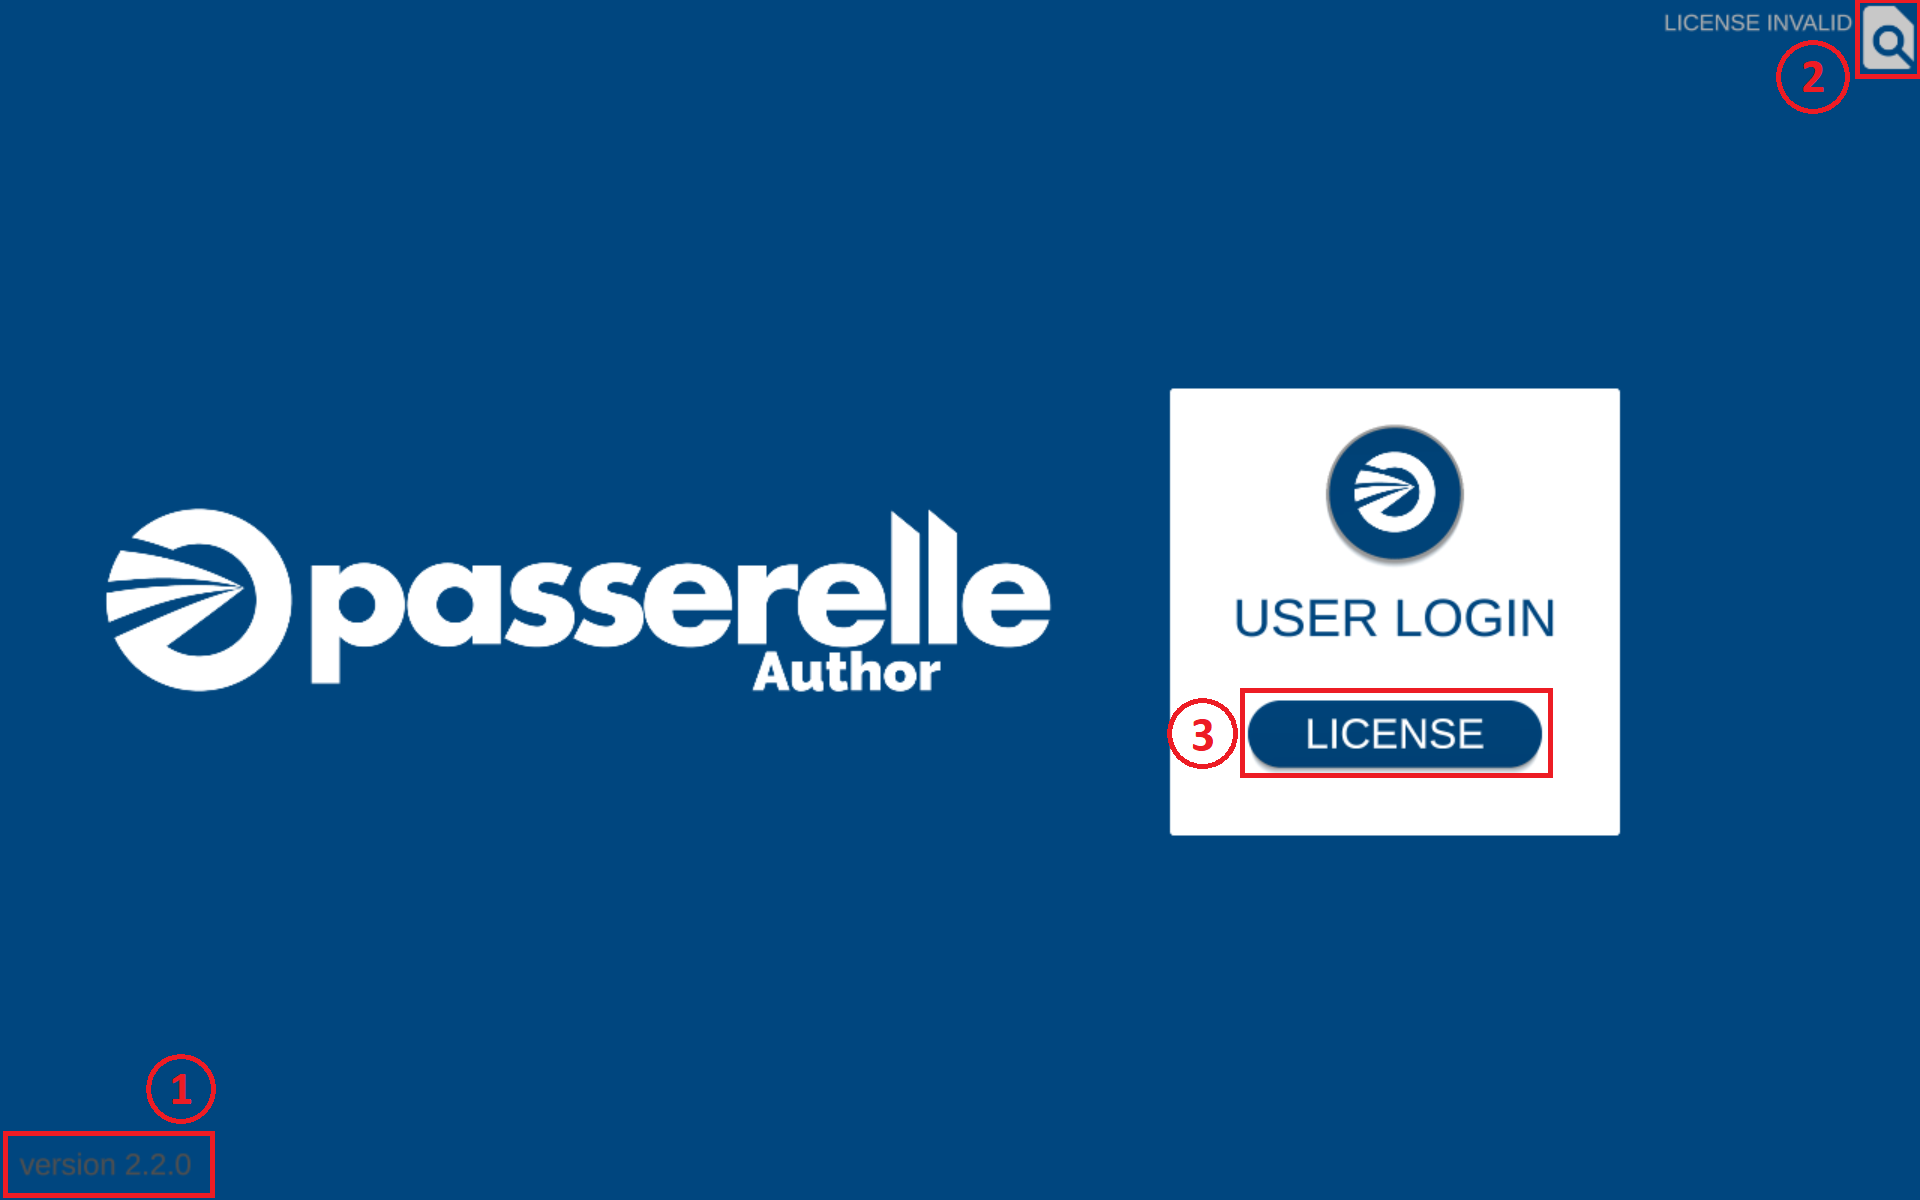
If you haven't provided a valid license file, you'll encounter a screen similar to this image. In the bottom left corner, you'll find the current application version (1), and in the top right corner, there's a "License Invalid" message. You can rectify this by either clicking the "Change License" button (2) in the top right corner or the "License" button (3) in the center. This will prompt you to select a license file using your File Explorer.
Authentication;
When you've provided a
valid license, you'll continue to the authentication screen. Instead of the "License Invalid" message, your
current Tenant and Environment (3) will be displayed in the top right corner, and the "License" button is replaced
with a "Login" button (4). Click the "Login" button to proceed.


This action will open a webpage in your internet browser. Here, you can enter your Username or Email (1) and Password (2) in the provided fields. Finally, click the "Sign In" button (3) to complete the authentication process. You can close the webpage once authentication is successful.
2. Project Manager
After successful authentication, you'll be directed to the "Project Manager" window. Here's what you can do:
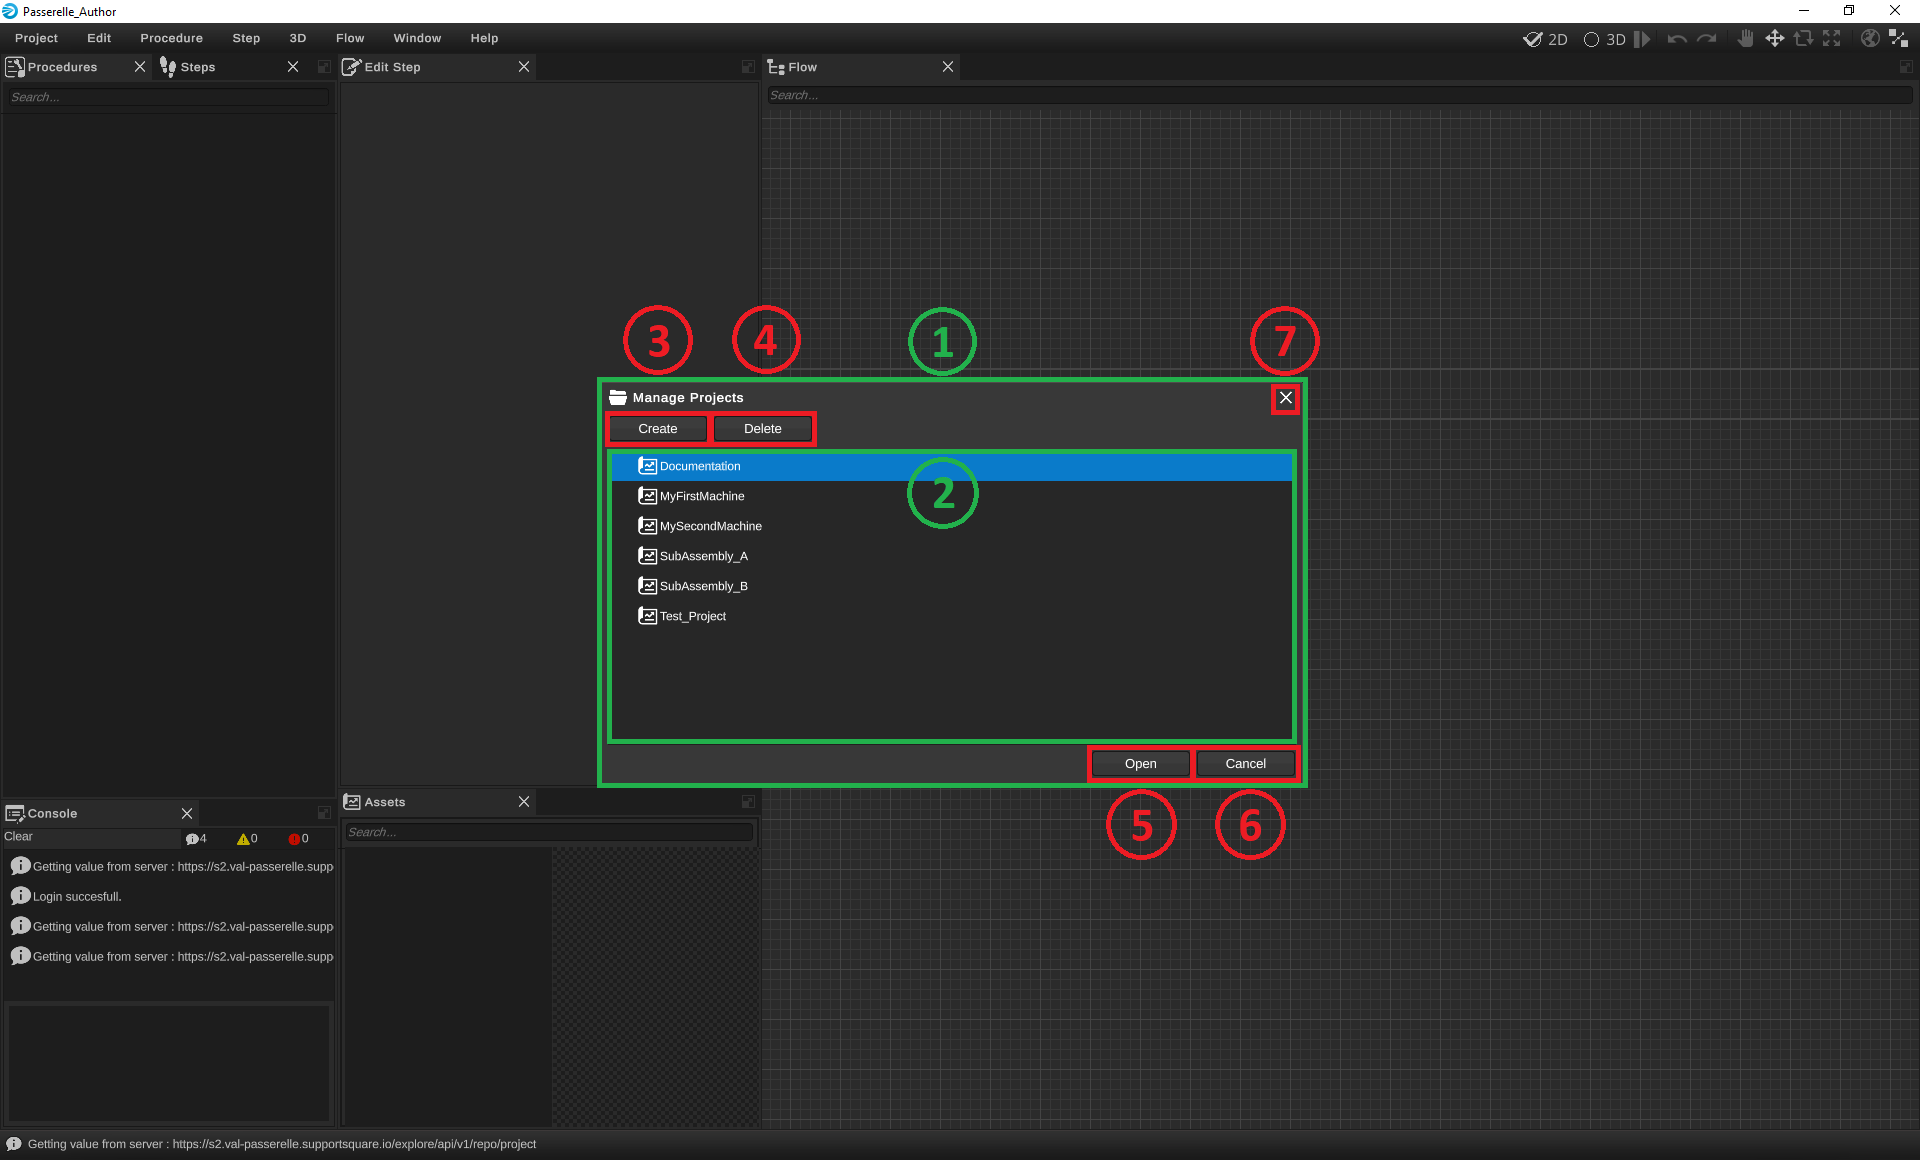
View Available Projects: The "Project Manager" window (1) displays a list of all your available Projects (2).
Open a Project: Select a Project from the list and click the "Open" button (5) or double-click the Project to open it.
Create a New Project: Click the "Create" button (3) to create a new Project. This action will open a temporary window.
Delete a Project: With the "Delete" button (4), you can remove existing Projects. Note that the removal is permanent and cannot be undone.
Both the CancelButton (6) and the CloseButton (7) will close this window without opening a Project.
Creating a New Project:
In the "Create Project" window (1), you'll find an input field (2) where you can enter the name for your new Project. Click the "Create" button (3) to finalize the project creation process. The new Project will then be opened.
You can close the window without creating a Project by clicking the "Cancel" button (4) or the "Close" button (5). The "Project Manager" window will then return.


Switching Projects:
If you wish to change your current Project, navigate to the Project menu in the top left corner of your screen and select "Project Manager" (1). This will reopen the "Project Manager" window.
Troubleshooting:
If the desired Project doesn't appear in the "Project Manager" window, it could be due to insufficient access or a different Tenant/Environment. You can log in to a different Tenant/Environment by going to the Project menu and selecting "Return To Login" (2) from the top left of your screen.
3. Author navigation
When you open a new Author-Project for the first time, you'll find a toolbar on top of your screen. This toolbar offers various options for quick navigation within Author:

1) Menus: On the far left, you'll find expandable menus that reveal additional functionalities.
2) Title Bar: For now, the title bar will be displaying your Project name. Once you have more Procedures and Steps in your Project, you'll also see the names of your current Procedure and Step here.
3) Workspace Toggle: You can switch between your 2D and 3D workspace using these buttons. You can see this in the following video as well.
4) Play Button: The Play button opens a separate Operator app in another window, allowing you to preview your current Procedure and Steps.
5) Undo and Redo Buttons: These buttons are for undoing and redoing your actions, respectively. When there are no actions to be undone or redone, these buttons will be greyed out.
6) Navigation Buttons: On the far right, there are six buttons for navigating within the 3D workspace. We'll explain these in more detail later.
Regions:
The rest of the screen is divided into regions, each with its own functionality. You can resize each region to suit your preferences. In the top right corner of each region, you'll find a "Maximize" Button that temporarily enlarges the corresponding region. Clicking the "Maximize" Button again returns it to its previous size. Some regions also have multiple tabs, as seen with the "Procedure" window and the "Step" window. You can see all these functions in the following video.
Drag & Drop:
You can further customize the layout by dragging a window's header and dropping it elsewhere, as demonstrated in the following video. Dropping a window can create a free region among the existing ones. When you drag a window close to the border of an existing region, it automatically snaps to the edge, creating a new horizontal or vertical region. Dropping a window onto the header of another window adds it as a new tab.
Window Creation:
You can also remove windows by clicking the "Close" button in the window's header. Note that removing a window does not delete the data within; it simply hides the data. You can bring back removed windows or add new ones by going to the "Window" menu at the top left of your screen and clicking "Create Window" and then selecting the desired window name. Some windows allow multiple instances to be active simultaneously, while others only allow one active instance at a time.
Layouts:
If you want to save your current layout (including any modifications you made) for future sessions, go to the "Window" menu at the top left of your screen and select "Save Custom Layout". Passerelle Author already comes with two default layouts. You can switch between these layouts or your own custom layout by going to the "Window" menu and selecting "Load Layout", as demonstrated in the following video. Note that in order to load another layout, the application will require you to authenticate again.
4. Controls & Shortcuts
Passerelle Author offers a wide range of actions, and most of them come with customizable controls and shortcuts to match your preferences. Here, we will explore how to access and modify these settings.

Accessing Controls and Shortcuts:
To view and adjust all available controls and shortcuts, head to the "Edit" menu and select "Controls..." (1).
This will open the "Controls" window, where you can examine and tweak every keybinding in the application.
For more advanced settings, you can choose "Settings..." from the "Edit" menu.
The "Controls" window (1) houses a list of every customizable keybinding in the application (2). Just below this list, you'll find two buttons to reset all keybindings to default configurations for a Qwerty keyboard (3) or an Azerty keyboard (4). This makes it easy to switch between keyboard setups without diving into each individual keybinding. Passerelle Author starts with the Qwerty configuration as the default.
To apply and save your changes, click the "OK" button (5). If you wish to close the "Controls" window without applying or saving your changes, you can click either the "Cancel" button (6) or the "Close" button (7). There's also a search bar (8) in the "Controls" window to quickly locate specific controls you want to modify.

Next to each control and shortcut, you'll find one or more keybindings (1). A keybinding can consist of a single keyboard or mouse button or a combination involving the "Control," "Shift," and/or "Alt" buttons on the keyboard. Click the "Edit" button (2) next to a keybinding to make changes. While editing a keybinding, you'll see the "Press any key to bind..." message.
Some controls can have multiple keybindings assigned to them. Next to the "Edit" button is the "Remove" button (3), which lets you remove the corresponding keybinding.
On the far right of each control, you'll find the "Add" button (4), which allows you to add another keybinding to that control.

5. Import Model & 3D Workspace
Lorem ipsum ...

1) Toggle 3D Workspace
2) "Scene" window
3) "Hierarchy" window
4) "Inspector" window
Navigating in the "Scene" window ...
"ImportModel" window ...

Importing 3D models ...
"Hierarchy" window ...
Create QR Code
- Open a third-party QR code generator. Examples of third-party QR code generators include the following: Note
- Your use of third-party QR code generators is subject to the third party’s terms and privacy policy. Please consult with your legal professionals before using. Microsoft does not endorse any particular third-party QR code generator and assumes no responsibility or liability for any third-party application you elect to use.
- When you use any third-party QR code generator, the QR code generator receives access to the string of your guides link.
- Copy the link from step 1 and paste it into the third-party QR code generator.
- Generate the QR code. We recommend using the following settings:
- Border: Minimum of 4. This number represents the number of small black square spaces (modules) around the border of the QR code. A value less than 4 will result in degradation in the detection rate of the HoloLens sensors.
- Foreground color: Black (Hex#000000)
- Background color: Hex#BBBCBF. This provides a 30% gray background to help improve the contrast of the QR code. This setting provides the best adaptability for a wide variety of environments and lighting conditions. If you have trouble detecting an anchor that you provide, try adjusting the anchor's image brightness to match the average environmental brightness around the anchor.
- Type: Select Text or Raw Text. DO NOT select URL. If you select URL, the site may incorrectly prefix the Guides deep link with "HTTP" or "HTTPS", which will cause the deep link to fail.
6. Create Procedures
Lorem ipsum ...
"CreateProcedure" window ...

Create Procedures ...

Procedure created ... (automatically starts with a new Step)
Edit Procedures ...
7. Create Steps
Lorem ipsum ...
"CreateStep" window ...

Create Steps ...

Steps created ...
Edit Steps ...
8. NodeFlow
Lorem ipsum ...
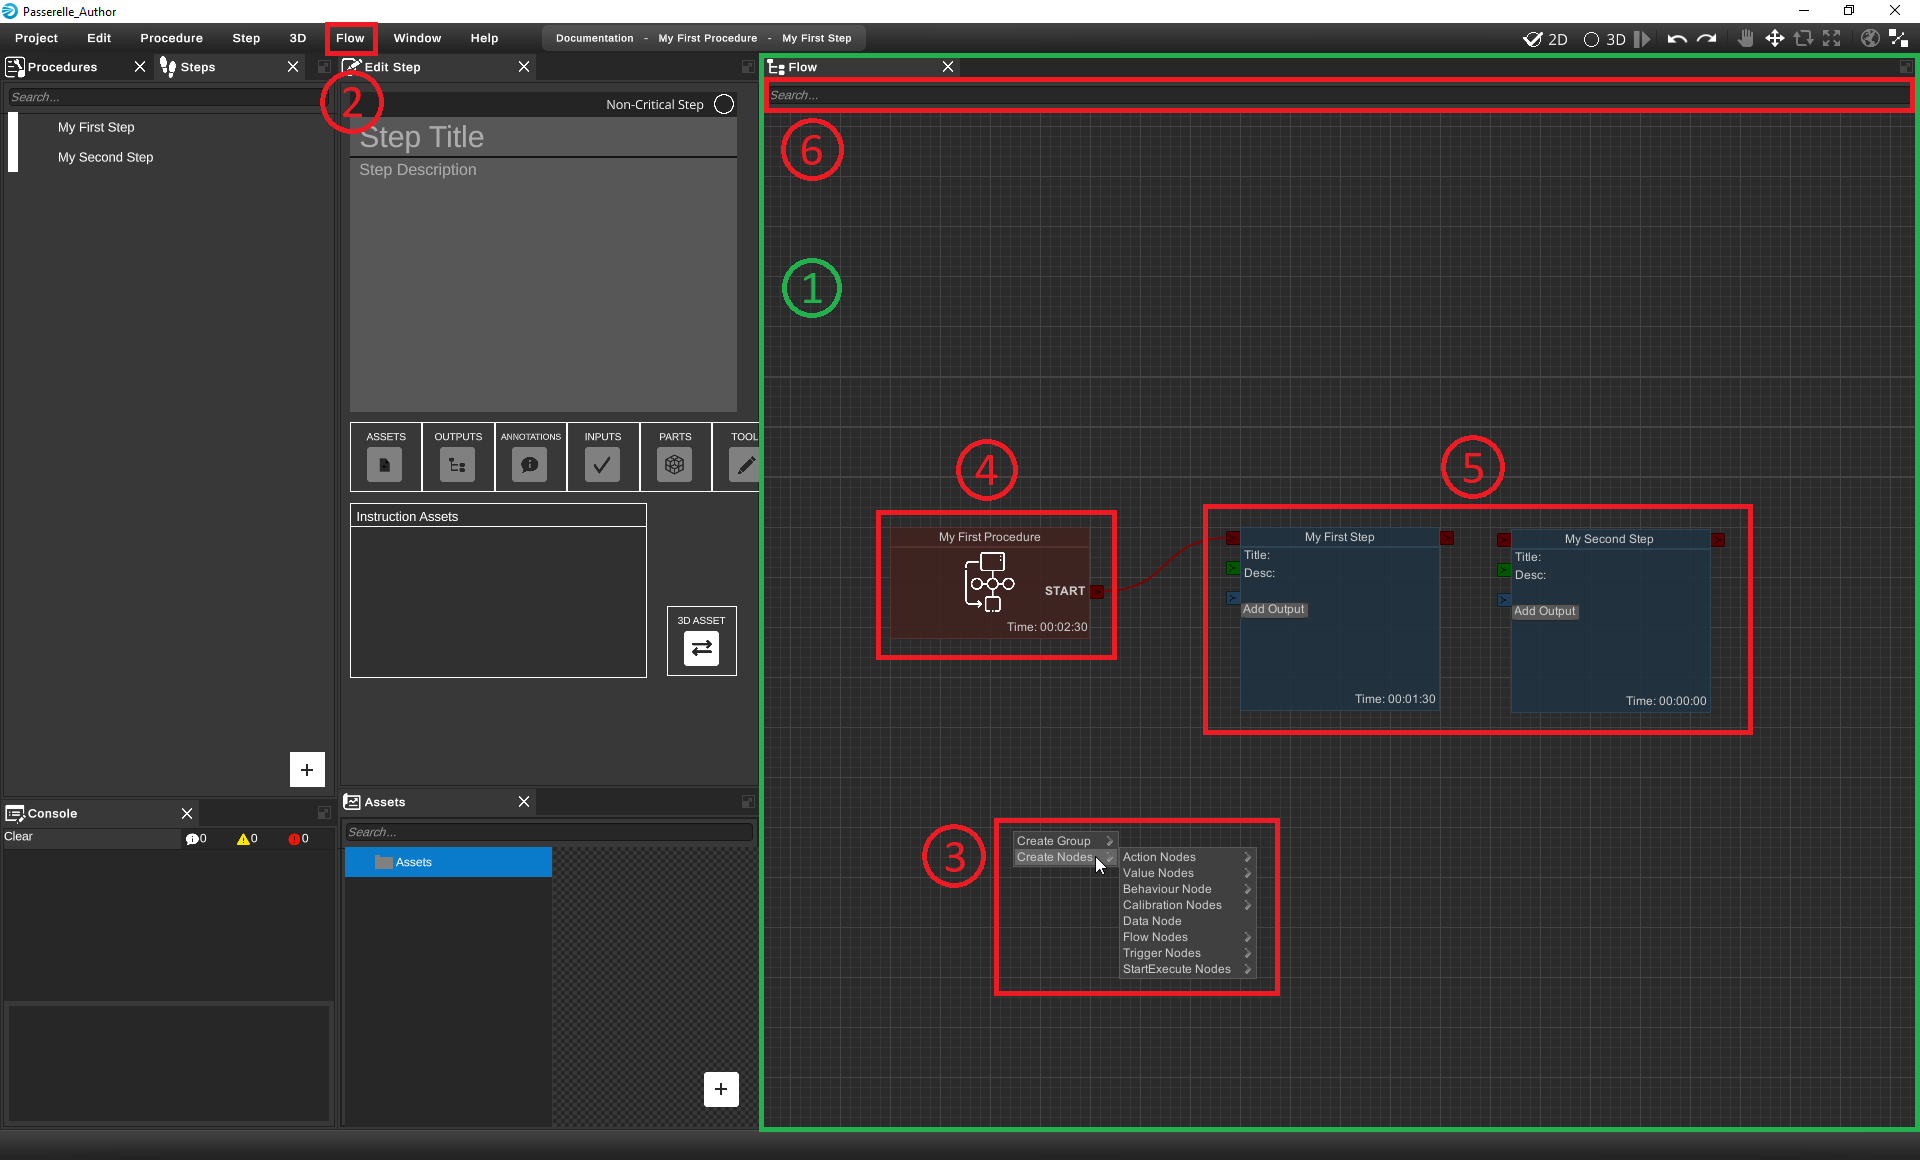
"NodeFlow" window ...
Navigating in the "NodeFlow" window ...
Creating and deleting nodes ...
Nodes, ports and connections ...
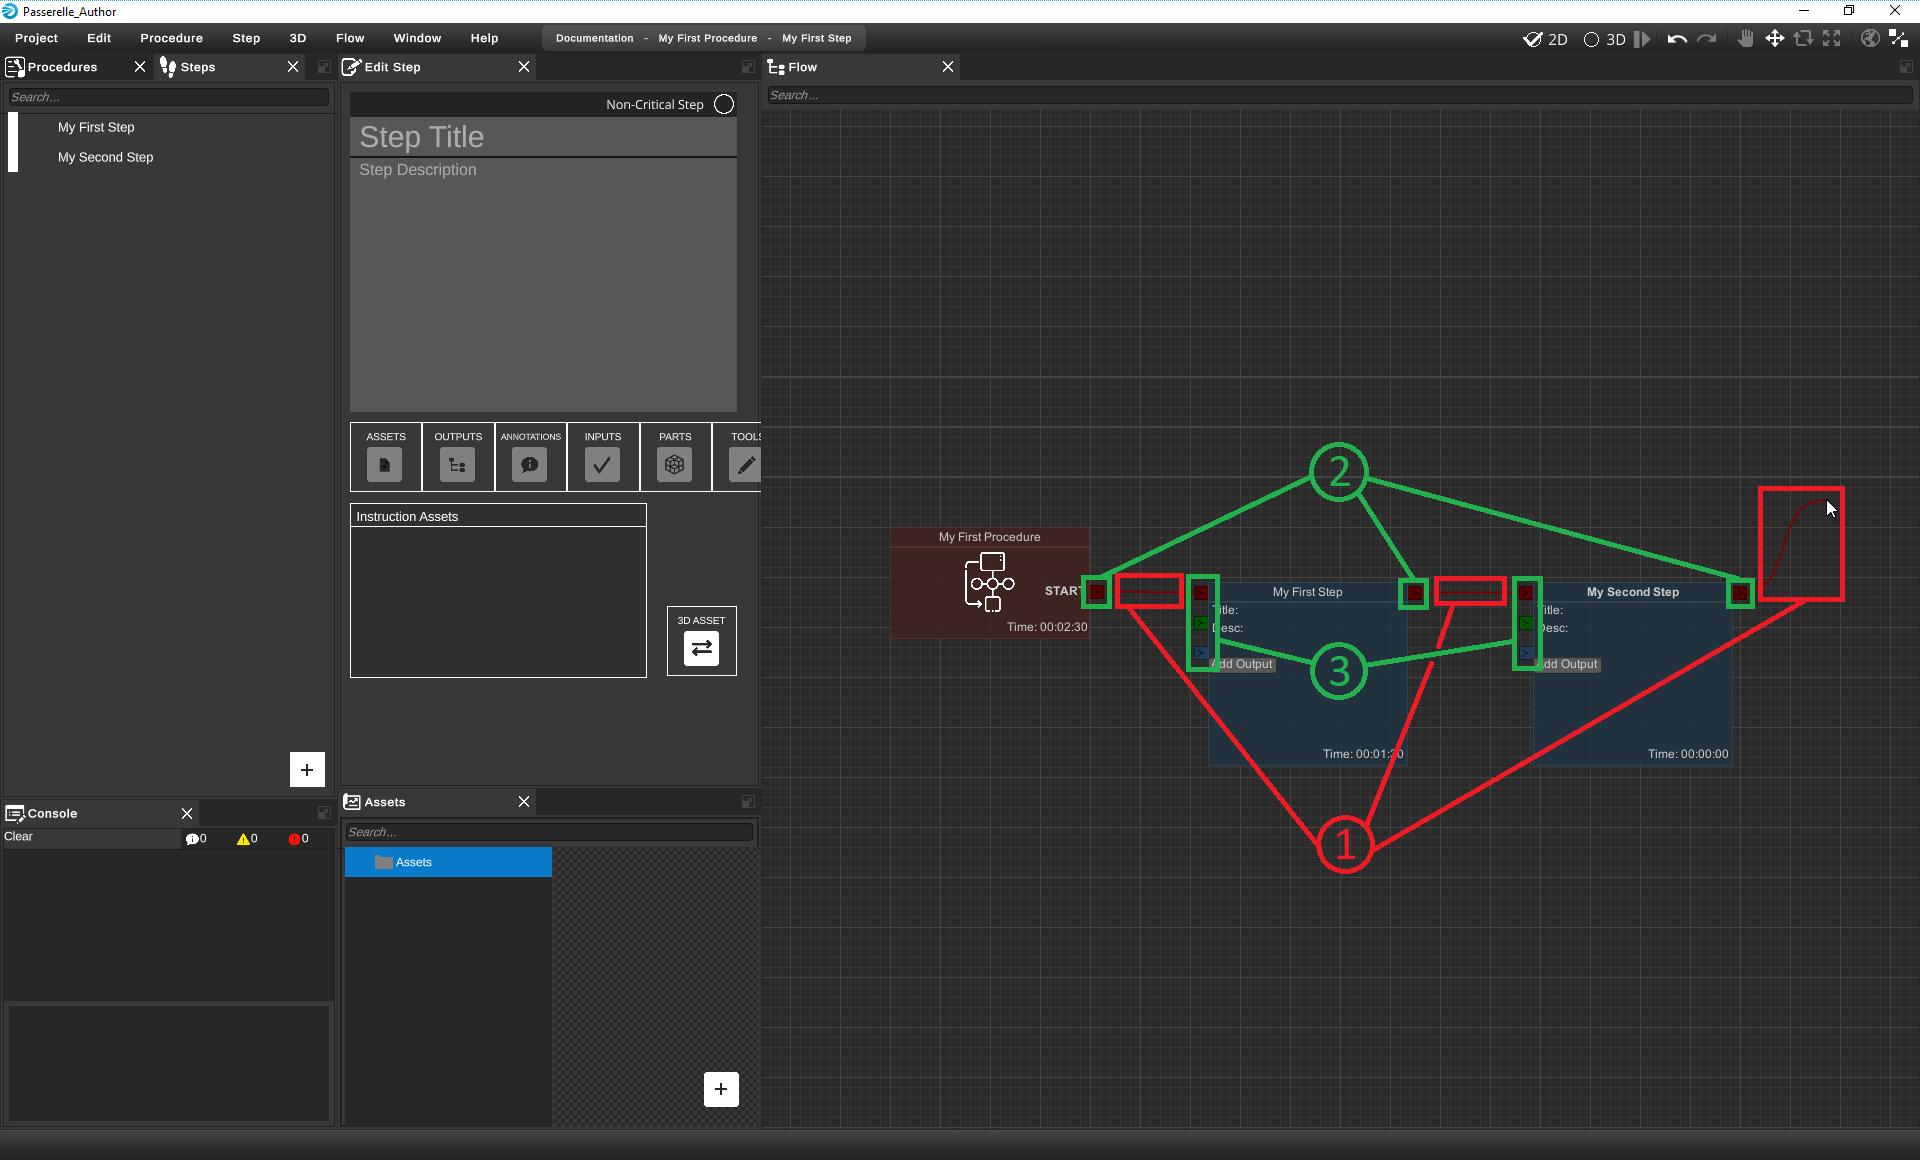
Connecting nodes...
9. Add Images/Videos
Lorem ipsum ...
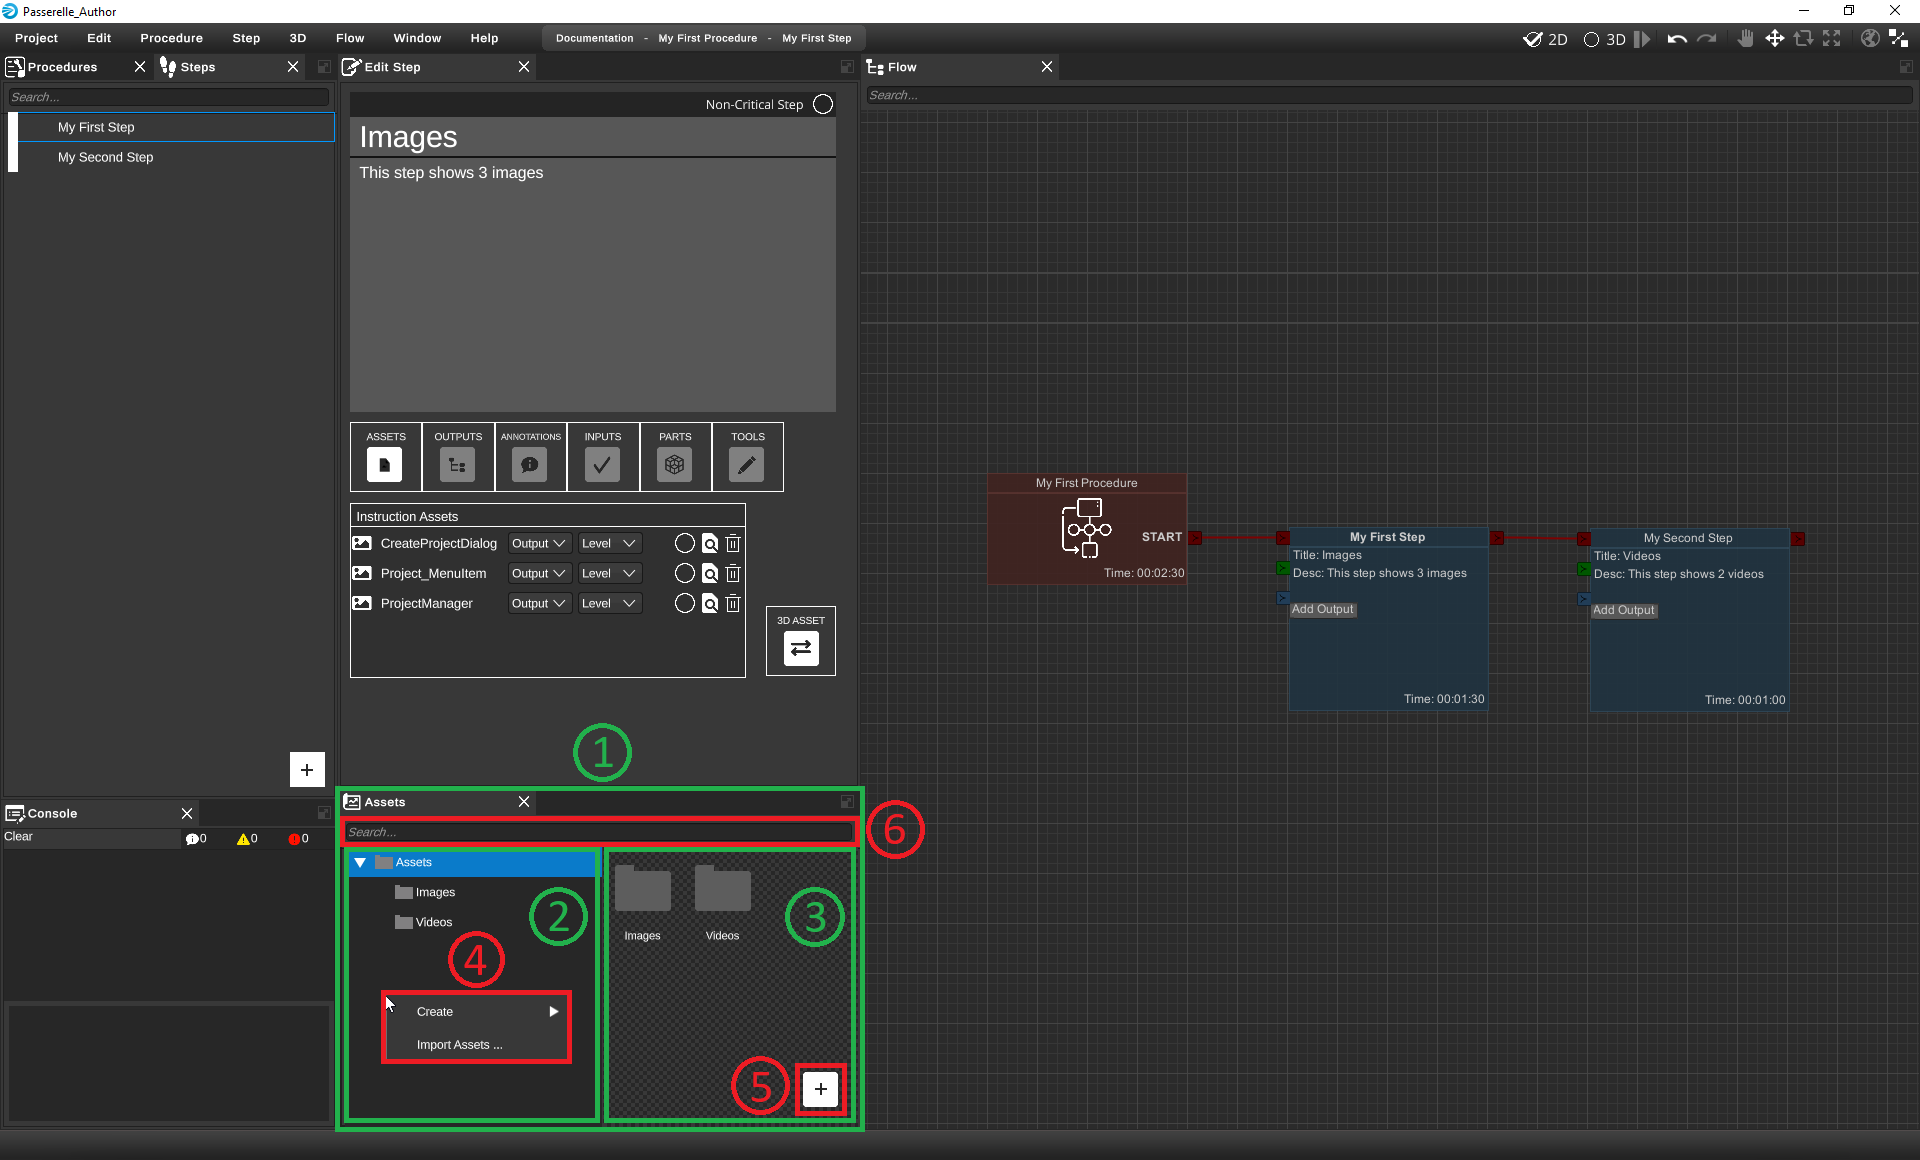
"Assets" window ...
Importing assets ...
"StepMaker" window ...
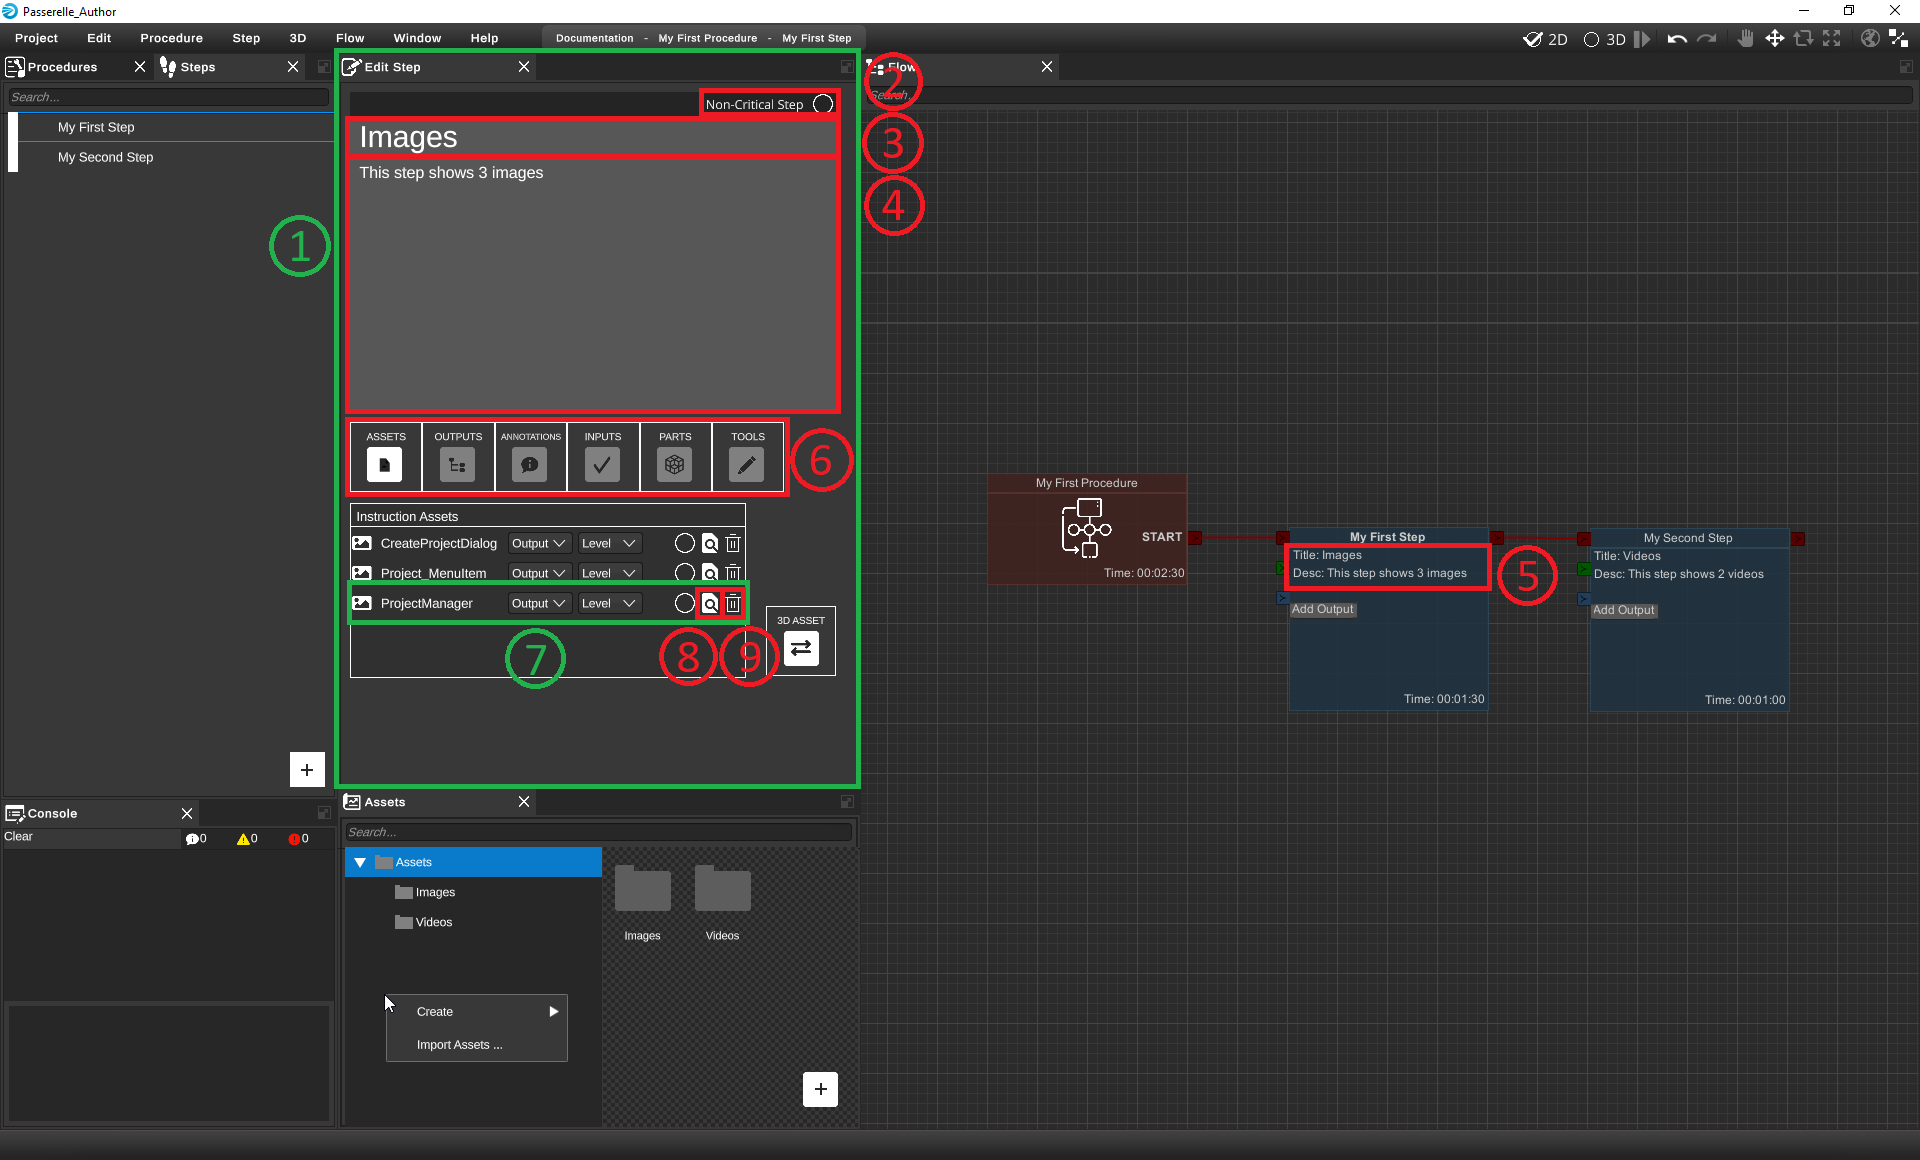
Adding Images and Videos to Steps...
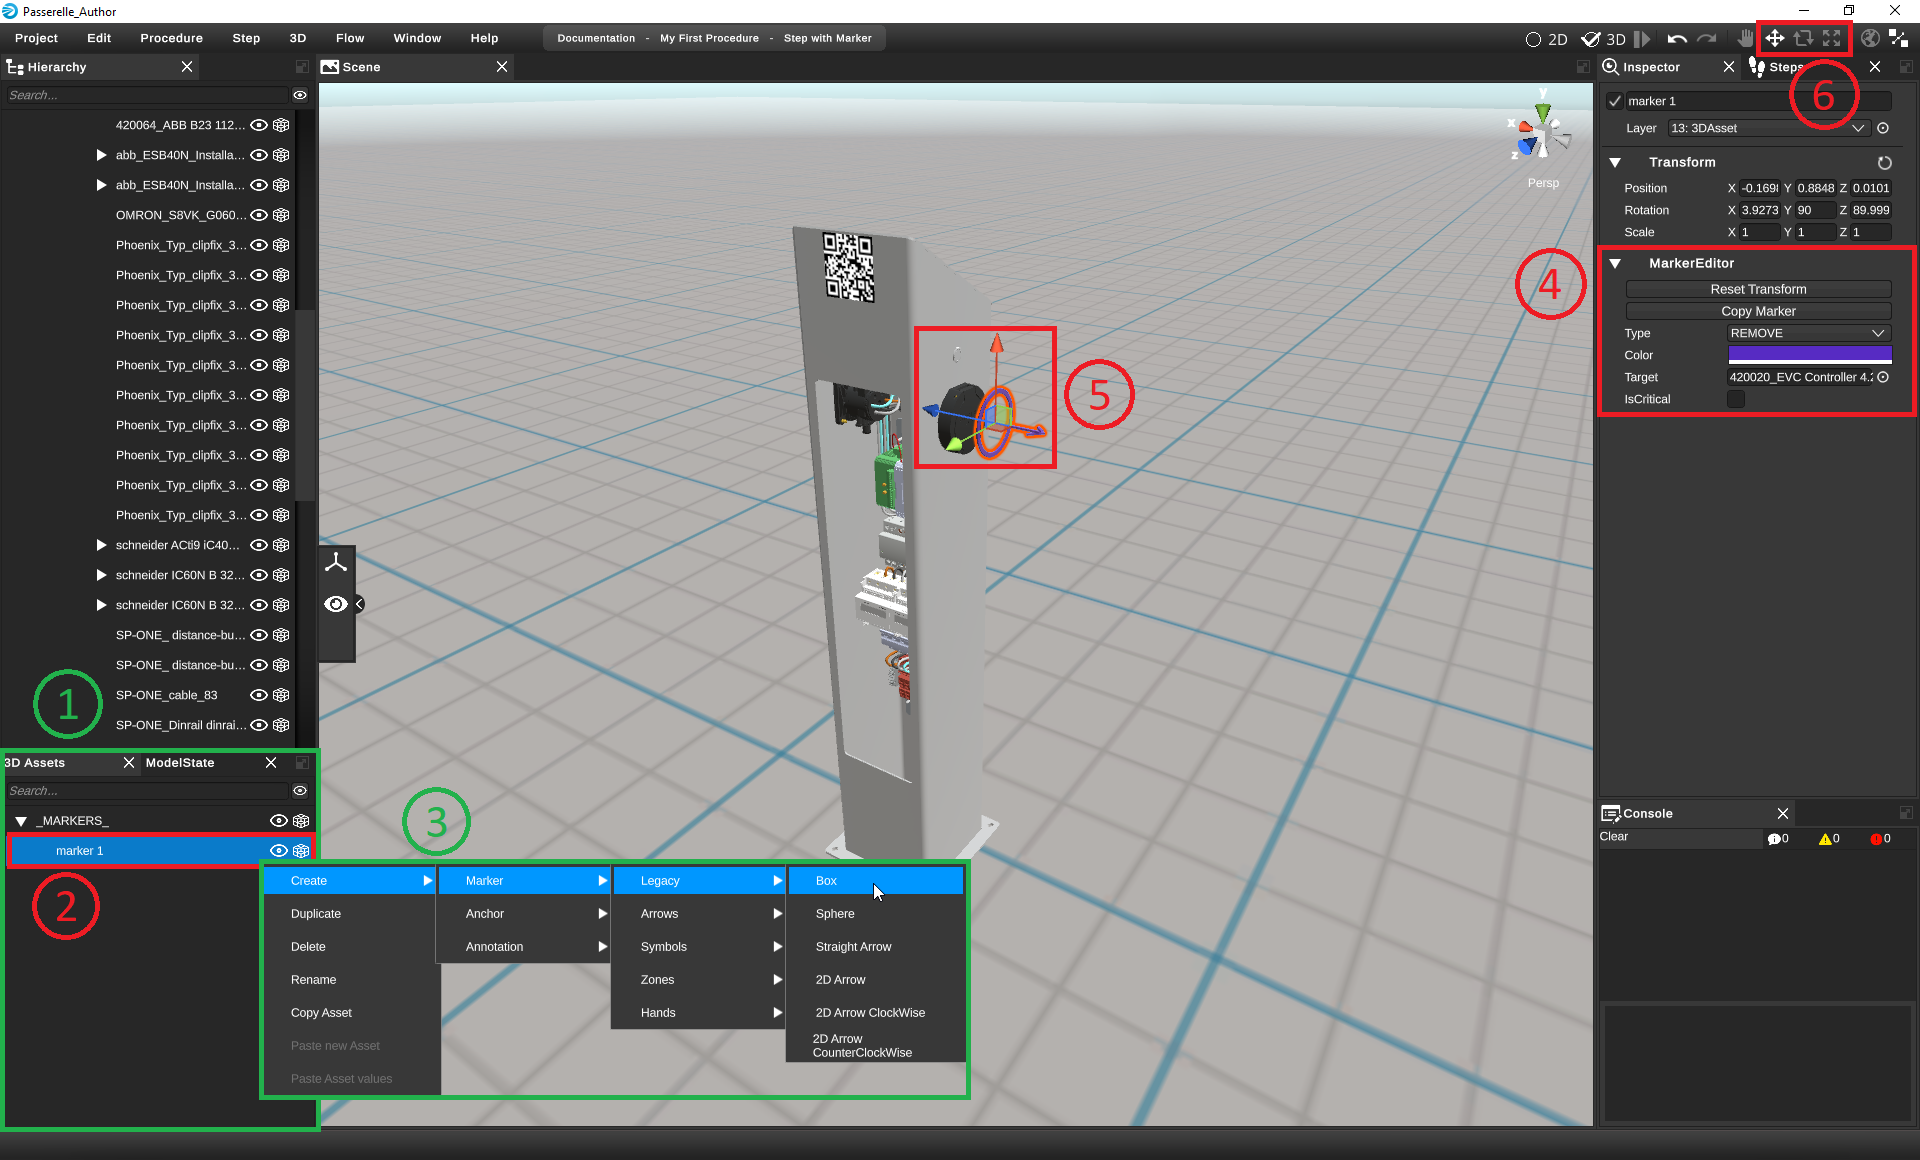
10. Create Markers
Lorem ipsum ...
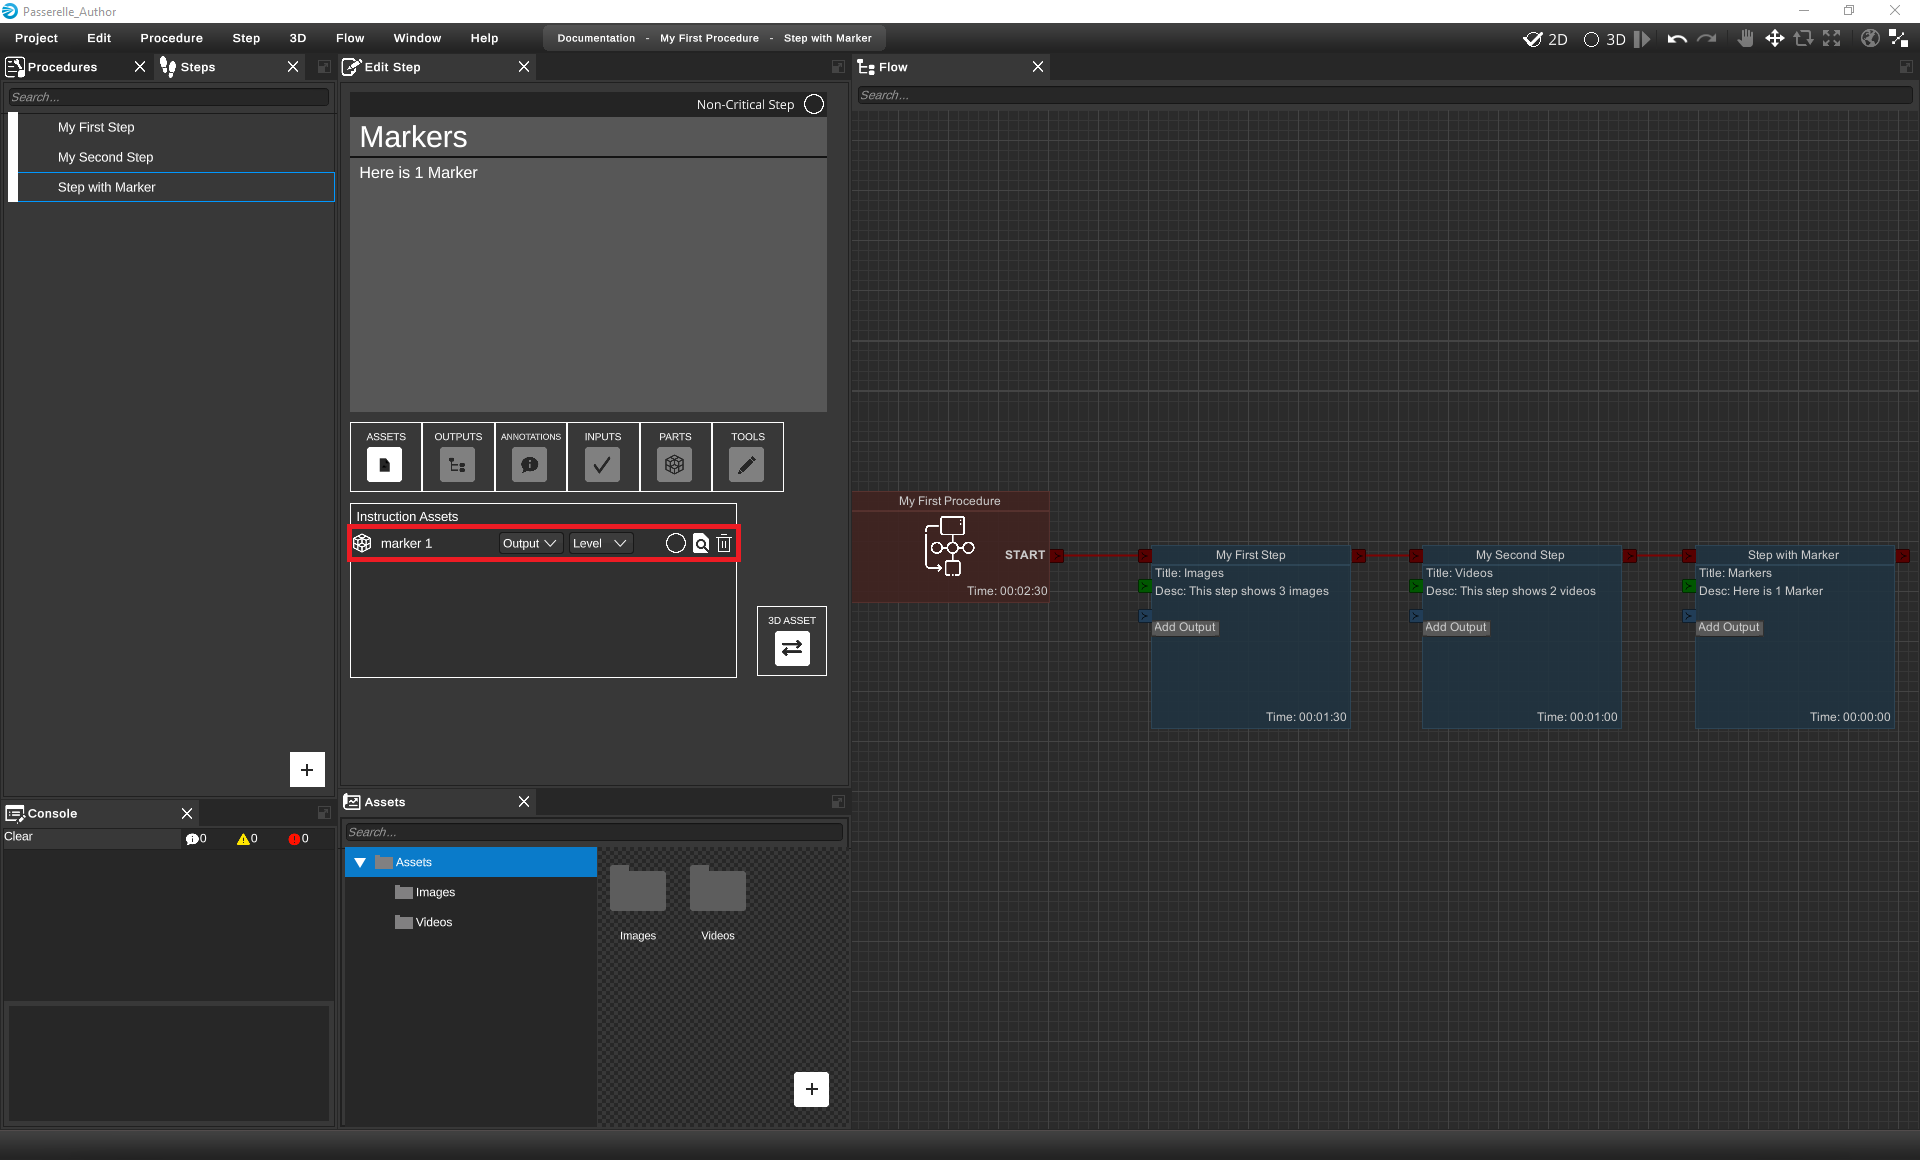
Creating and editing Markers ...
Markers appear under the 'Assets' tab ...
11. Create Highlights
Lorem ipsum ...
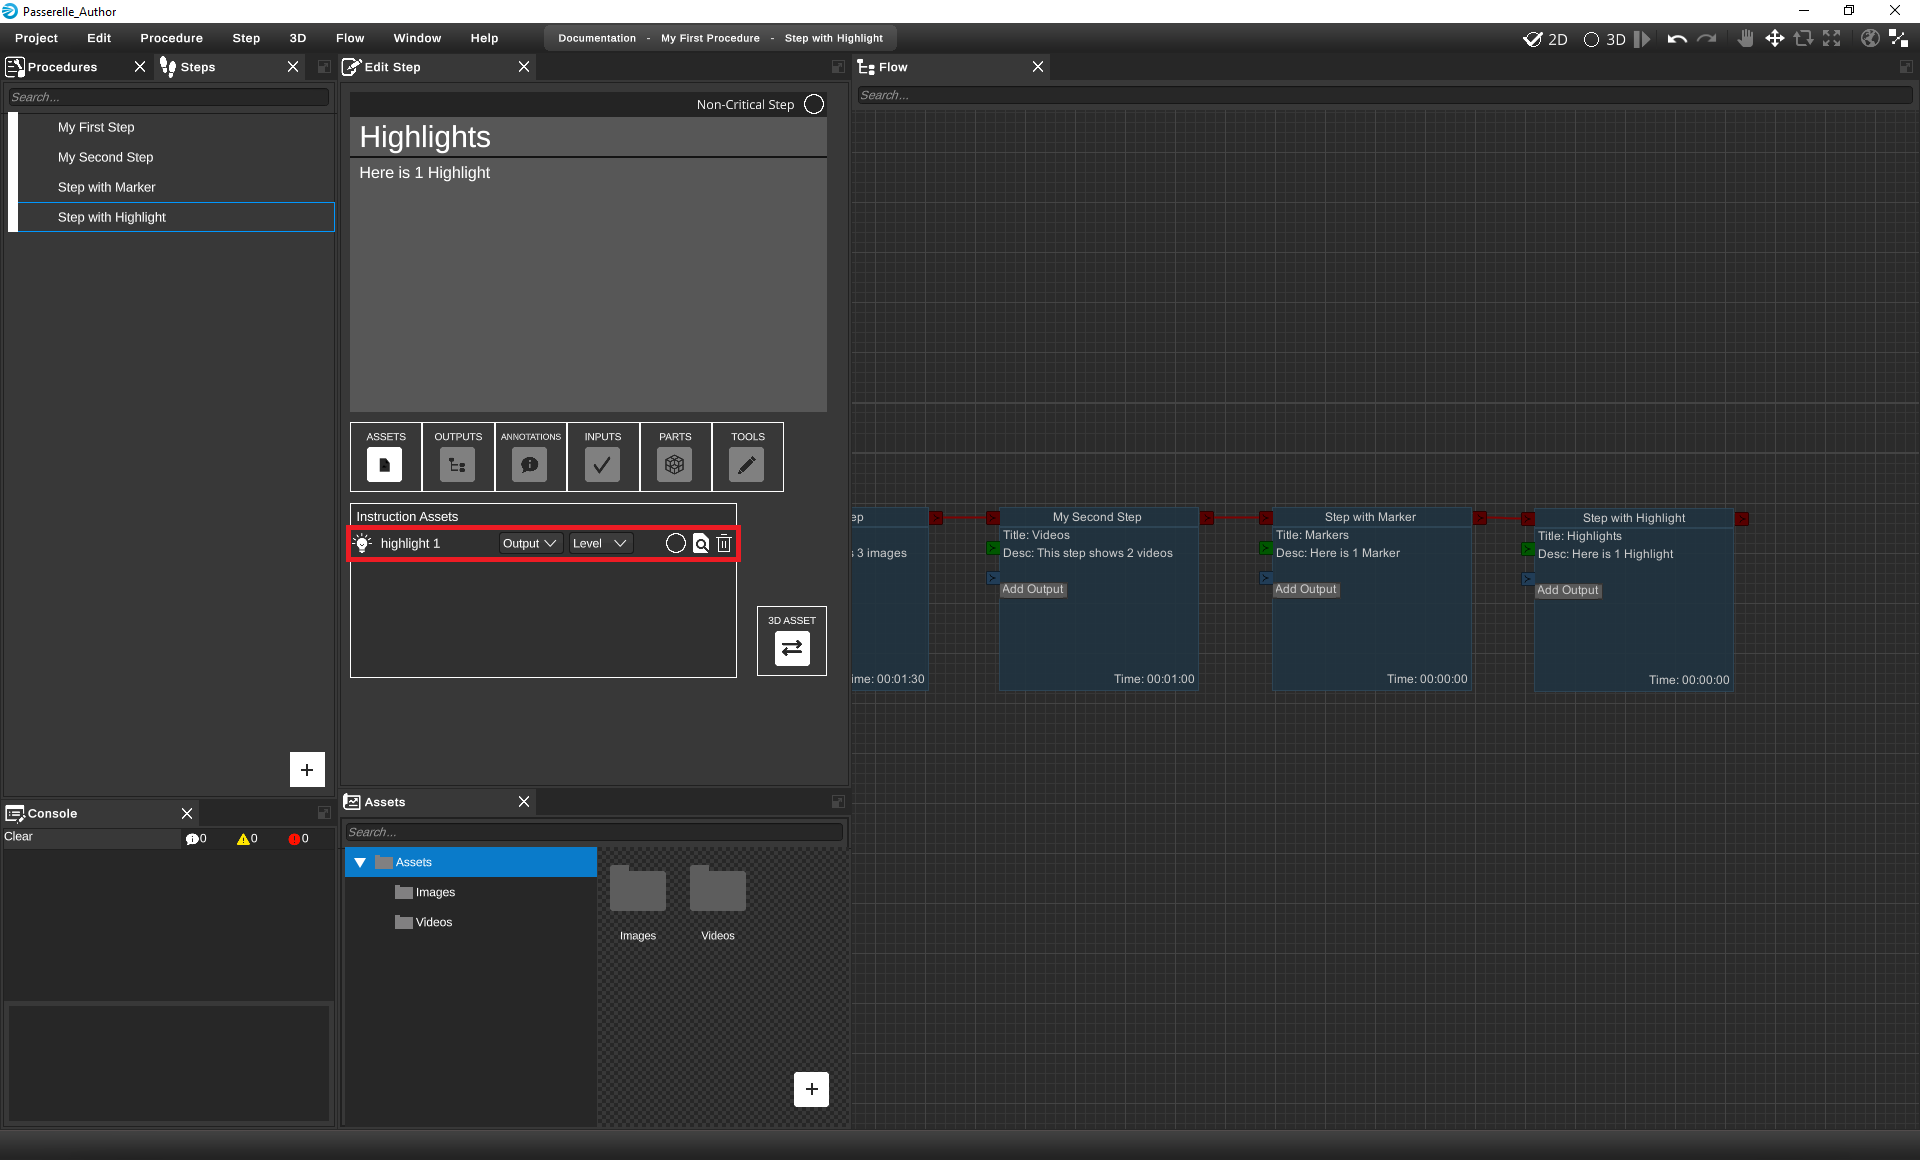
Creating and editing Highlights ...
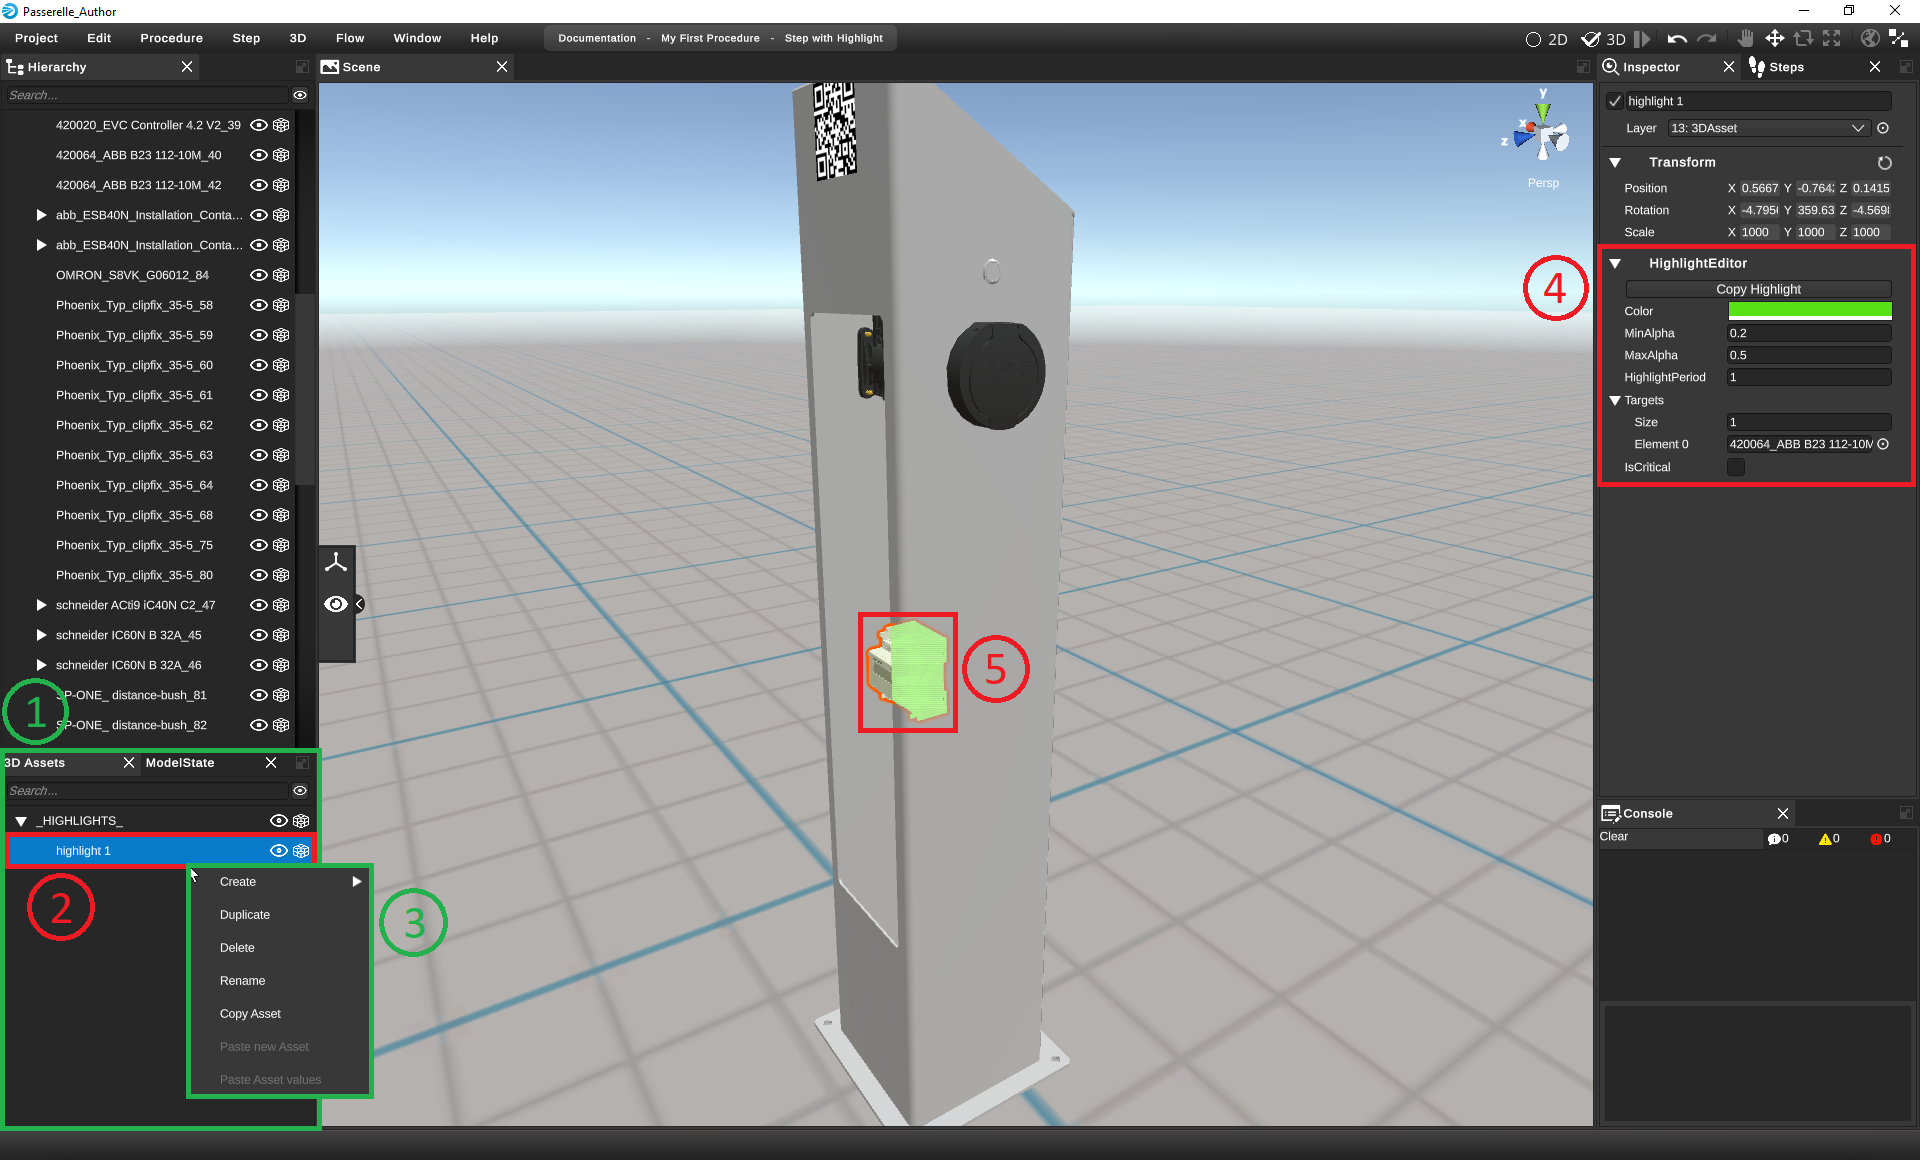
Highlights appear under the 'Assets' tab ...
12. Cameras & Preview & StartParts
Lorem ipsum ...
13. Assign Parts to Steps
Lorem ipsum ...